Introduction:
In today’s world, where technology is advancing at a rapid pace, we find ourselves surrounded by discarded electronic devices. One such device is the power bank, which, despite its useful life coming to an end, can be repurposed into a DIY solar-powered laptop charger. This article will guide you through the process of creating a sustainable and eco-friendly charging solution for your laptop using discarded power banks and solar panels.

Materials Needed:
1. Discarded power banks (at least 2)
2. Solar panels (with a voltage and current rating suitable for your laptop)
3. Soldering iron and solder
4. Jumper wires
5. Diodes (one for each power bank)
6. A multimeter
7. Heat shrink tubing
8. Electrical tape
9. Scissors or wire cutters
10. A drill and drill bits (if necessary)
Step 1: Assess the Power Banks
Before starting the project, make sure the power banks are in good condition. Check for any physical damage, such as cracks or frayed wires, and ensure that the charging circuit is still functional.
Step 2: Disassemble the Power Banks
Using a screwdriver, carefully disassemble the power banks to access the internal components. Disconnect the battery and charging circuit from the case.
Step 3: Connect the Solar Panels
Attach the solar panels to the power banks using the soldering iron and solder. Ensure that the positive and negative terminals of the solar panels are connected to the appropriate terminals on the power banks.
Step 4: Install Diodes
To prevent backfeeding, install a diode in series with each power bank. This will ensure that the solar panels can only charge the power banks and not vice versa. Solder the diodes in place and use heat shrink tubing to insulate the connections.
Step 5: Test the Connections
Use a multimeter to test the connections between the solar panels, power banks, and diodes. Make sure that the voltage and current readings are within the specifications of your laptop.
Step 6: Assemble the Charger
Reassemble the power banks by reconnecting the battery and charging circuit to the case. If necessary, use the drill and drill bits to create a hole for the solar panels to fit through.
Step 7: Secure the Solar Panels
Attach the solar panels to the power banks using the provided brackets or by making your own brackets using metal or plastic. Ensure that the solar panels are securely fastened and can be easily detached if needed.
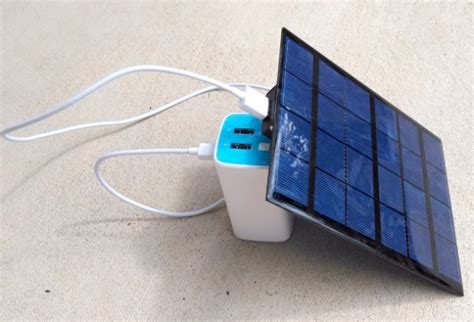
Step 8: Test the Solar-Powered Laptop Charger
Connect your laptop to the DIY solar-powered charger using the provided USB cable. Observe the charging process and ensure that your laptop is charging correctly.
Conclusion:
By repurposing discarded power banks and solar panels, you can create a sustainable and eco-friendly charging solution for your laptop. This DIY solar-powered laptop charger not only helps reduce electronic waste but also provides a cost-effective and environmentally friendly alternative to traditional charging methods. Happy DIY-ing!